Life, art, and nature on Maryland's Eastern Shore.
Showing posts with label embroidery. Show all posts

Monday, July 8, 2013

EASY ZINNIA STITCH: A HOW-TO

For those of you, who kindly expressed an interest in learning the Zinnia Stitch from last week's flower/dragonfly embroidery. Here we go. This stitch is very easy and you should be able to stitch a bouquet in the time it takes to watch a good movie. 
All you need is an embroidery needle, perle cotton or embroidery floss, linen (or similar) to stitch on, an embroidery hoop, scissors, and a fabric marker or pencil to draw circles.
I like to use perle cotton for these. The colors are luscious and it is thick, with a nice sheen, which makes it perfect. Nothing subtle about a zinnia, so you'll want lots of texture and some eye-popping colors.

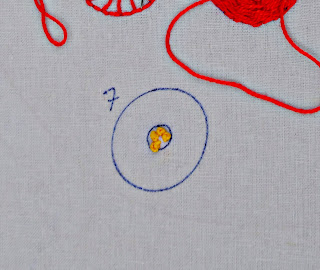
Use a fabric marker or pencil to draw a circle on your fabric, whatever size suits your project. Mine are appr. 2 inches. Draw a smaller circle in the middle for the flower center. Make them perfect or draw them free hand. I happen to think a little lopsidedness makes them more real. (Fig. 1)
Bringing your needle up from the back, make long straight stitches equidistant around the circle, from the inner circle to the outer. We'll call these spokes. My circle has 16 spokes. (Fig.2)

Outline the circle with small straight stitches, then bringing your needle through from the back, begin to weave over and under the spokes. (Fig. 3)
Continue weaving until you have completely filled in the circle. If you have hand drawn your circle and one side fills up more quickly than the other, you may need to work back and forth across the larger half of the circle to fill it in. (Fig.4)

For variation, and to add more depth, you can weave in one direction for two or three rows and then reverse for two or three until you have completely filled the circle. You may also opt to alternate rows of weaving over and under one spoke, with rows of weaving over and under two. Secure your stitching at the back. (Fig. 5)

To add more interest and a petal-like texture, bring the needle up from behind the flower, over two or three stitches and down, making little tacks here and there around the flower. (Fig. 6)

Fill the center of your zinnia with french knots to finish, or add a button. (Fig.7)
I like to back my flowers with fusible webbing, cut them out, and attach them to other projects.  I hope this is clear as a bell, but if not, please feel free to email any questions to barnbugstudio@gmail.com.  
Happy stitching. XO.


Thursday, October 18, 2012

EASY PEASY LEAF PROJECT

Let's have some fun with leaves.
Gather a selection of autumn leaves while you're out walking your dogs.
Arrange them on a copier and print onto fabric. You may use the prepared printer fabric or iron a piece of light colored fabric to freezer paper. White will give you the most vivid color.
I love this part! It's difficult to tell the real from printed, isn't it?
Remove the paper backing. Iron a fusible bonding product to the back. I like Pellon Wonder Under. Cut out the leaves. You could outline them with fabric marker first, for more definition. I didn't.
Cut a piece of background fabric and quilt batting (a piece of felt, or scrap of wool is fine, use what you have).
Arrange the leaves on the background fabric. Just play with them until you're pleased. I machine-stitched my leaves, so I removed them and fused them one at a time, in order to overlap them. Remember to use a sheet of parchment or press cloth when you iron them on.  Continue until all your leaves are fused and machine-stitched. 
Now get out your embroidery floss and Perle cotton and embellish with hand-stitching.
I chose a pale yellow cotton velvet for my background (8 X 10). I wanted the added texture. Use a variety of simple embroidery stitches to add stems and berries, etc. Take a few pics while you're gathering leaves and use them for inspiration.
Voila!
I added poke berries, branches, a sweet gum ball, and a little metallic thread for dewdrops. The possibilities are endless. Now I get to decide whether to back it, and use it as a wall hanging, or stitch it onto a pillow or tote bag.
Use your imagination and add your favorite embellishments. I think it would be fun to stitch several individual leaves to frame as a group.
Hope you're doing something with leaves, besides raking, at your place. XO.

Materials and Supplies

selection of autumn leaves
printer fabric
copy machine
sewing machine
background fabric and batting
a selection of embroidery threads and needles
fusible bonding product (Pellon Wonder Under)
buttons and other embellishments, as desired

If you're not a fabric person, you could just copy some leaves on paper to use for collage backgrounds, and scrapbooking.

Friday, July 27, 2012

LITTLE VINE COVERED COTTAGE AND OTHER ASSORTED DISASTERS

On Tuesday morning, I wandered through our little woods with the camera, looking for inspiration...
Not a lot is blooming there now, but I love the color of leaves, back-lit by the morning light.
And there was trumpet vine...
And honeysuckle...
Which started me thinking, how sweet it would be to have a little vine covered cottage in our woods, so I came in and rummaged through my vintage fabric stash, and began to stitch the little cottage that was in my head.
I had a little help sorting my embroidery supplies...
Guess which skein Scout "helped" with?
While I stitched, I thought a lot about what I'd put in my hideaway....a squashy chair with big fat arms to hold my embroidery supplies and mug, tea things, watercolors and sketching supplies, books and magazines, dog beds, a flowery hooked rug, a cookie or two, a bottle of wine for emergencies. I would not take my cell phone or laptop. I wouldn't need music, because the birdsong is riotous in our little woods in the morning. I would take my camera and binoculars for watching the wildlife.
I stitched until my middle finger bled (really) and had to resort to using a thimble. I'm not good with thimbles. I finished it this morning and couldn't wait to show you. I was going to ask what you would put in your little cottage in the woods. I took it up to my workroom, placed it on the ironing board, grabbed what I thought was a sheet of parchment paper for pressing, and pressed a few seconds before realizing I had grabbed FUSIBLE WEBBING. Crappity crap! And so much worse!!
Frantically, I tried to remove the sticky layer. I washed it, picked at it, scraped it. I look up from my ironing board to see a truck in the driveway. A delivery scheduled for after lunch, was arriving at 10:30 and me still bed-headed and wearing dirty barn clothes!  More words said. 
In the interest of keeping it real, I'm going to show a portion of it anyway...
Here's a bit of it, still wet from washing with bits of goo clinging and covering up my handstitching.
Disaster! I'm pretty good at making lemonade from lemons, but really don't think I'll be able to salvage this. I'll just have to consider it a lesson learned. I need to work tidier, so that fusible webbing is not sitting where parchment paper should be. I need to pay attention to what I am doing. I need to never ever do this again. 
I'll be adding insect repellent to my list of cottage supplies, because I just found a deer tick on my hip. Could this day be more perfect?
Any one else have a crafty disaster? Anyone know how to remove fusible goo? 
I'd still like to know what you'd put in your little cottage.
Also, check for ticks!

Thursday, July 12, 2012

MAKING STUFF

Making stuff here at BarnBug today. Rejuvenated by Ladies' Night, aided by a calm and napping puppy, it was a day for creativity. Rushed through my barn chores, wearing these...
New Sloggers! If you have to shovel manure..

Made some thread sketches...
Cut out and appliqued a couple of tote bags...
And washed and ironed some new additions to the vintage fabric stash. If you stop in tomorrow, I'll have a couple of finished projects to show you. Hopefully.
Hope you found the time to make something today. Even if it was just a sandwich. Or making do. Sometimes "making do" is the most creative of all. XO.

Thursday, February 23, 2012

RECYCLED RABBITS

Stitched up a fresh batch of spring bunnies, using vintage fabrics. Added a little embroidery here and there, and voila recycled rabbits! Here's a sampling...
Faded pink bark cloth with pearl cotton embroidery.
Tablecloth rabbit.

Seed sack rabbit.
Actually, these aren't the only rabbits I've "recycled." Two years ago, Nigel gifted me with these...
Petey, Pip, and Pinky
It isn't recommended that you try to save them. Apparently, it almost never works. These must have been just old enough. They survived and thrived, and three weeks later, we released them into our little woods, which is something of a rabbit sanctuary anyway. If you find a nest, please leave them be, their mother has not abandoned them. She only comes at night to nurse them, so as not to attract predators. 
And finally, just outside my front door today, the first daffodil!!!
Hope you're seeing signs of spring where you are!