All you need is an embroidery needle, perle cotton or embroidery floss, linen (or similar) to stitch on, an embroidery hoop, scissors, and a fabric marker or pencil to draw circles.
I like to use perle cotton for these. The colors are luscious and it is thick, with a nice sheen, which makes it perfect. Nothing subtle about a zinnia, so you'll want lots of texture and some eye-popping colors.
 Use a fabric marker or pencil to draw a circle on your fabric, whatever size suits your project. Mine are appr. 2 inches. Draw a smaller circle in the middle for the flower center. Make them perfect or draw them free hand. I happen to think a little lopsidedness makes them more real. (Fig. 1)
Bringing your needle up from the back, make long straight stitches equidistant around the circle, from the inner circle to the outer. We'll call these spokes. My circle has 16 spokes. (Fig.2)

Outline the circle with small straight stitches, then bringing your needle through from the back, begin to weave over and under the spokes. (Fig. 3)
Continue weaving until you have completely filled in the circle. If you have hand drawn your circle and one side fills up more quickly than the other, you may need to work back and forth across the larger half of the circle to fill it in. (Fig.4)

For variation, and to add more depth, you can weave in one direction for two or three rows and then reverse for two or three until you have completely filled the circle. You may also opt to alternate rows of weaving over and under one spoke, with rows of weaving over and under two. Secure your stitching at the back. (Fig. 5)

 Happy stitching. XO.
To add more interest and a petal-like texture, bring the needle up from behind the flower, over two or three stitches and down, making little tacks here and there around the flower. (Fig. 6)

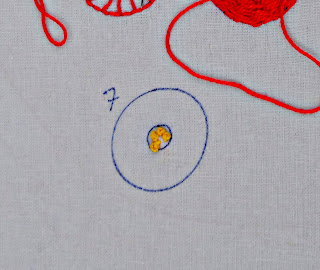
Fill the center of your zinnia with french knots to finish, or add a button. (Fig.7)
 I like to back my flowers with fusible webbing, cut them out, and attach them to other projects. I hope this is clear as a bell, but if not, please feel free to email any questions to barnbugstudio@gmail.com.


No comments:
Post a Comment
I love hearing from you!